Showing posts with label craft. Show all posts

Thursday, March 28, 2013

Easter Crafting


I’m so glad it’s almost Easter, and I’m thrilled that it’s finally starting to feel like Spring outside.  For a minute there I was worried we might have snow on Easter.  Today I spent some time working on a few decorations for Sunday.


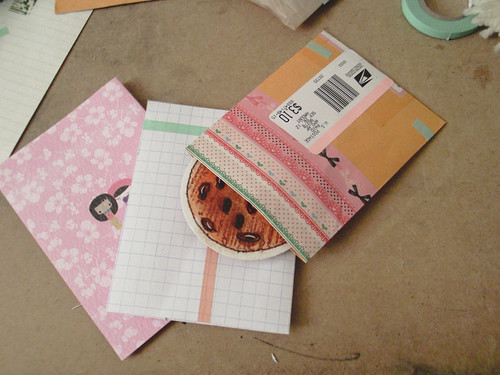
I made these little treat bags using paper shopping bags, old envelopes and washi tape.  They were really simple to make.  I created the pattern by taking apart a paper trinket bag and tracing it onto some cardstock.  Later this week they will get stuffed with tissue paper, plastic grass and candy.  I can’t wait to hand them out to my family.

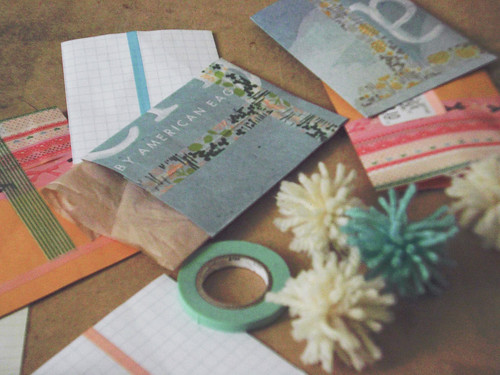
In addition to those, I made some pom poms that I plan to string together for garland.  This was my first time making them.  I always see them on my Pinterest feed and being incorporated into all sorts of projects, but I never took the time to figure out how to make them.  It was super easy!

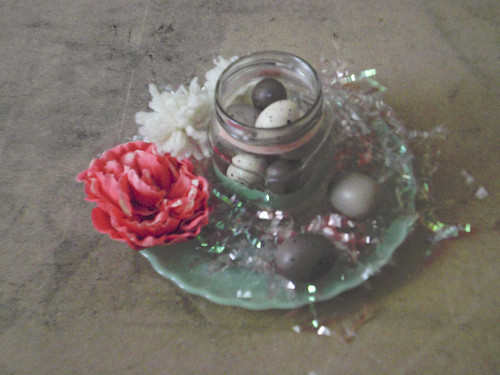
Another project I worked on today was a small centerpiece for one of our tables.  It’s a work in progress.  Usually I’m not of fan of artificial décor like fake fruit and flowers, but I actually work with these foam eggs quite a bit.  There’s something about them that appeals to me and blends in with the colors I like to use.  As for the flower, I’m still unsure of how I feel about it, but for now it’s helping me brainstorm.


Thursday, January 24, 2013

DIY // Elementary Kid Inspired Valentines


Today it finally snowed!  I was beginning to worry that we wouldn’t get any snow here at all this winter, but I woke up this morning to a cold room filled with soft light from the window.  My inner-kid immediately recognized the signs of snow and I pulled back the curtain for a quick glance at the white covered back yard before going back to sleep.

It’s funny how that child-like wonder of snow has stuck with me, even as an adult.  Winter was always an exciting time of year filled with holiday parties in class and hopes of school cancellations.  The feeling stayed with me throughout the day and got me thinking about another favorite thing about winter that’s coming up: Valentine’s Day.


Do you remember the little valentines you have to fold in half that come in the cardboard boxes?  I loved those things when I was little.  They always come in designs of cute cartoons.  In school we would make little ‘mail boxes’ from paper bags to tape to our desks.  Did anyone else do that?  On Valentine’s Day we would have a small party where everyone would deliver cards into the mail boxes.  At the end of the day they would be filled with lots of little cardboard valentines.


 Feeling nostalgic, I decided to make some of my own.  All you need are index cards and whatever supplies you would like for decorating.  Fold the index cards in half, then have fun decorating them inside and out.  This is a great project to do with kids, or you can make them for your friends and family to smile back on those childhood days.

Recommended Supplies:

3” x 5” assorted color index cards
deco and washi tapes
die cut hearts
glue stick
bone folder (for scoring the folded card)
rubber stamps
scrap papers and magazines
kid safe scissors
assorted stickers

Tuesday, December 18, 2012

DIY // Eraser Stamped Gift Tags

I had to do a double take when I looked at today's date.  Not only did December sneak up on me, it's flying by.  Yesterday my family and I got our tree.  The cats are having a blast with it, as always.  It's hard to believe the holiday is right around the corner and I haven't wrapped a single gift.


I did find time to make some gift tags over the weekend.  The idea came from Martha Stewart's Encyclopedia of Crafts, which I checked out from the library.  It's a wonderful and inspriing book.  Projects and tutoriols are so accessible on the internet now that I don't look at craft books much, but it was very refreshing to flip through page after page of beautiful craft work.

Anyway, there was stamping project using the erasers on the ends of No. 2. pencils to create little flower patterns.  I went simpler and took the polka dot route, decorating a few shipping tags.  After that I made a few of my own tags from card stock.  A brand new pencil eraser will give you a perfectly round stamped circle, but for some fun I did a bit of stamping with worn erases, too.  The end of a glue stick provided a nice circle stamp as well, and I enjoyed making patterns with it.


Hopefully I can get some presents wrapped this week and put these tags to use.

Happy Holidays everyone!

Friday, November 23, 2012

DIY // Rustic Cinnamon Stick Holiday Table Decorations


Here’s a quick idea I had for holiday table decorations that don’t fall into the trap of traditional holiday colors.  There’s a spool of scrap fabric ribbon I’ve been adding to, and I thought some of it would look nice tied around of a bag of cinnamon sticks I found from last Fall.  I’m a sucker for any kind of pastel fabric paired with natural materials. 

For this project you’ll need some cinnamon sticks, various ribbon, washi tape and anything else you think would be fun to work with.  To make the fabric ribbon, collect some scraps and cut them into strips.  You can mix and match the sizes.  Tie them together and wind them onto an empty spool. 


Cut 18” of the ribbon and tie it around the cinnamon sticks.  I used two sticks, but feel free to add more – just be sure to cut a few extra inches of ribbon.  These are nice to sit on napkins for place settings or to accent a centerpiece.  To make place cards, you can tie on a shipping tag as well.

After making a few with the fabric ribbon I decided to break out the washi tape (because I love to add it to everything) and tried making one that way.  It looked a little plain so I added a thin strip of cream polyester ribbon.  The tape gave it a nice modern look.


Pine cones would be another way you could try to make these.  The idea is to find materials to work with that are in season, but to have fun with the colors you accent them with.  Experiment with what you find and show me what you make!

Thursday, October 11, 2012

Crafting Inspiration from the New Etude House Catalogue


 I received the new Etude House catalogue in the mail!  It’s so lovely that I had to take a few pictures to share.  Earlier this year a snail mail pal in Korea sent me a copy of their last catalogue.  I completely fell in love with the design and she was kind enough to send me a copy of the newest one when it came out.  Their catalogues are themed around a doll house and are designed like a scrapbook.  They’re so fun to look through and if you do any kind of collage work there is a lot to be inspired by.


All of their products have adorably designed packaging.  I don’t wear make up, but I’m a sucker for pinks and pastels.  They provide great pallet inspiration.


This style cartoon would make a fun scrapbooking technique, don’t you think? 

  
In the back of this issue there was a little project idea for a kind of clothes line version of a mood board.  They stretched a few feet of bakers twine across a wall, and then used mini clothes pins to hang up little bits of decorative ephemera.  Try it out!